Ideas for teaching waves using laptops
This is another topic that lends itself to practical work, but many students do not always recognise what they are supposed to be observing in the practical work, or else do not recognise the significance of what they observe. So, for this reason, the simulations available from a number of sources are useful for students to work on as an investigation in parallel with activities using real equipment. Even in the practical activities, the laptops provided have a number of tools useful for practical work in this topic. These tools include:
- Using the microphone, to record sound into Audacity for analysis.
- Using the web cam to record what is happening with light.
Suggested teaching sequence:
You may download a OneNote file with some of this material ready for a teacher to adapt and use in a classroom that follows some of these lessons..
- Either discuss with students (or challenge students to come up with) evidence that sound is produced by vibrations. If students can't think of any evidence, then provide them with balloons, and ask them to feel the balloons as they speak. Also ask them to vibrate a ruler over the edge of a desk. The evidence of photos or labeled diagrams can then be submitted into a common class OneNote document. This would then lead on to perhaps discussing the idea of energy.
- Use Wave Maker: wave power from TALE (Search for Wave Maker: wave power) to introduce the concepts of measuring amplitude and wavelength of some waves.
- Use of Audacity, to create screen shots of real sound waves and mark the wavelength (as best as can be done) and amplitude. This can then be repeated using a number of different sounds to relate pitch to wavelength and
 volume to amplitude.
 - Students should then investigate some aspect of waves using the Wave on a string simulation, particularly the relationship between frequency and wavelength. An experiment on the effect on amplitude would be good too. (Best settings are to have "no end", tension fairly high; when using the oscillate option, use a lower frequency; The ruler option and Timer option can then be used to make measurements of wavelength and amplitude - with the Pause button helping. The timer option would be needed to make measurements of velocity). The relationship between frequency and wavelength could be investigated. Students should then present their experimental report for marking. A follow-up activity using springs may then be appropriate.
- An experiment on echoes using the Seeing with sound: Echo Lab from TALE (Search for Echo lab Seeing with sound) will allow students to perform calculations of velocity of waves. (There are other version of this tool on TALE if you wanted to emphasise certain parts of this).
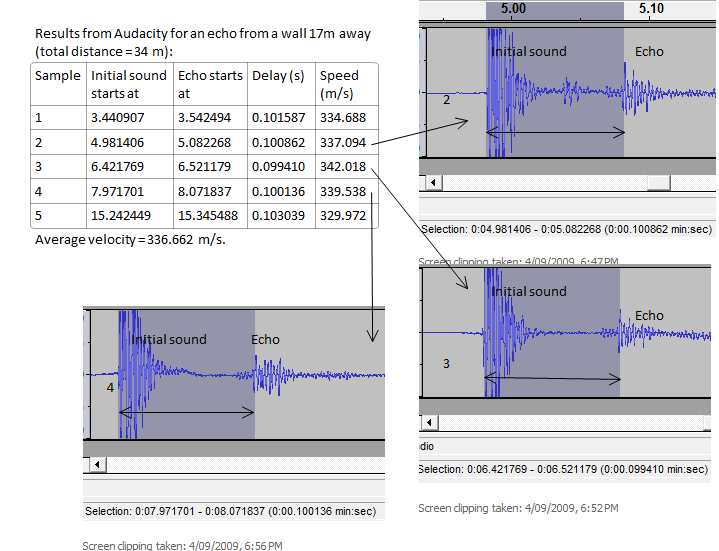
- This could then be followed up with a real echo experiment. In the echo experiment, a place outside is found where a loud noise will not disturb other people, and where an echo occurs - perhaps the sound could echo off a brick wall. Students stand a known distance from the brick wall, and make a sharp, loud noise while recording it in Audacity. The microphone of the laptop should point towards the wall while the recording is happening. When the echo has occurred, the recording is stopped and Audacity is used to analyse the time between the original sound and the echo. This could then be used to measure the speed of the sound. Discussion could also lead students to think about reliability by repeating this experiment a number of times, or over a larger distance. Here is a sample screen-shot of the results from this experiment, as recorded in OneNote, before being used to produce a report on the Speed of Sound.
- The concepts of light and the electromagnetic spectrum could be introduced using NASA's electromagnetic Spectrum page. A quiz could be used as students investigate it, using whichever is your favourite method of quizzing students (See examples of a Learning activity quiz based on the NASA site, a Hot Potatoes matching activity and a SRN / SmartBoard quiz). Alternatively use a forum where each group needs to try to present a case for why their alloted wave type is either most useful or most powerful.
- Use the Commonwealth Government's Curriculum resource on Light for a number of exercises for students to complete as they develop their notes on light.
- Practical work on ray boxes to study reflection, refraction and colour could be completed such as what is suggested on the same series of curriculum pages. The students could take photographs using the camera on their laptop to present a detailed explanation of each concept. The project would be to present what they find in each investigation.
- An alternative, students could use the simulation (learning object) on refraction from TALE (use code X067P) to investigate refraction and where it occurs. Each could be written up as an experiment and submitted as a report. (Other resources and ideas can be found in the Preliminary Physics Explorer from CLI (Use code X01N2 and view under reflection and refraction). Students could produce a video to show a coin (or washer) appearing in the bottom of a cup (or beaker) as it is filed up, showing the effects of refraction.
- See the Curriculum Resources page